

Intro
Just a heads-up, this will contain spoilers for Day 5 of Advent of Code 2022.
My solutions can be found here
It’s that time of year again! We’re in the midst of the fun annual programming challenge “Advent of Code”; a daily dose of programming problems throughout December.
I’ve already raved about using Clerk for AoC, and I’m back again with something a little more advanced. If you didn’t catch last year’s post on using Clerk for AoC, I suggest you read it and come back here afterwards. I’ll wait!
Fancy custom viewers
Let’s talk more about something we touched on only briefly last year: custom viewers.
Clerk allows you to easily create custom ways to display and interact with data. So rather than tell, let’s show!
Here’s a ‘more fancy’ version of what we’re going to build:
This version has a lot of neat features, but for simplicity’s sake we’ll skip some of these and build a basic viewer. This complete version can be found here.
Building a viewer
Many of my solutions use reduce for the final answer, so for my viewer I was able to instead call reductions to get a list of all the intermediary steps. For the purposes of this demo, let’s create a dummy vector of fake steps.
(def data
  [[["O"] ["R" "P" "T" "X" "U" "J"]]
   [["O" "R"] ["P" "T" "X" "U" "J"]]
   [["O" "R" "P"] ["T" "X" "U" "J"]]
   [["O" "R" "P" "T"] ["X" "U" "J"]]
   [["O" "R" "P" "T" "X"] ["U" "J"]]
   [["O" "R" "P" "T" "X" "U"] ["J"]]
   [["O" "R" "P" "T" "X" "U" "J"] []]
   [["R" "P" "T" "X" "U" "J"] ["O"]]
   [["P" "T" "X" "U" "J"] ["O" "R"]]
   [["T" "X" "U" "J"] ["O" "R" "P"]]])
Now let’s create a simple viewer to check our data works, and ensure that this data comes through cleanly. Because of how Clerk works, the data is passed from Clojure-land to ClojureScript-land through SCI and a websocket, and we have to define a viewer as a simple object with a quoted function.
We also have to specify that the viewer uses a so-called :transform-fn to intercept and translate the data before it gets passed to the component. Here, we want to call out to nextjournal.clerk/mark-presented to prevent our data from being translated to a more parseable format.
Putting all that together we have
(def crates-viewer
  {:transform-fn clerk/mark-presented
   :render-fn
   '(fn [steps]
      [:div (pr-str steps)])})

^{::clerk/no-cache true}
(clerk/with-viewer crates-viewer data)
Which gives us a simple printout of all the data. The metadata here is important for development as it prevents caching from occurring. By default, form results are cached and only recomputed when something changes. When we’re happy with it, we can remove the metadata; but it also isn’t doing much harm.
Great! Our input vector is a vector of steps, each step having a number of towers. Since each step isn’t technically guaranteed to have the same amount of towers, we have to have some way to tell the CSS to handle that nicely. We also need some kind of state to track with the slider, so we can get the right value and render it.
That sounds like a lot, but we’ll get there!
First let’s have our viewer just render a single step.
(def crates-viewer
  {:transform-fn clerk/mark-presented
   :render-fn
   '(fn [steps]
      (into
       [:div]
       (for [tower (first steps)]
         [:div (pr-str tower)])))})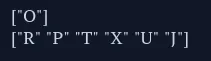
This is shaping up well already. Now we have each tower, let’s render them. For this we’ll use CSS Grid as we can easily create a number of fixed columns that can change. We’ll add some basic styling here too.
Out of the box, Clerk already comes with Tailwind support both for dev and prod; so no changes needed here and we can just add in classes:
(def crates-viewer
  {:transform-fn clerk/mark-presented
   :render-fn
   '(fn [steps]
      (into
       [:div.grid.bg-white.overflow-y.h-full
        {:style
         {:grid-template-columns (str "repeat(" (count (first steps)) ", minmax(0, 1fr))")}}]
       (for [tower (first steps)]
         (into
          [:div.flex.flex-col.justify-end]
          (for [crate tower]
            [:div.text-black crate])))))})
We use simple interpolation to define a repeated list of columns based on the count, as well as adding some styling and flexbox to the columns to differentiate them. This looks fine so far, but we can do some styling tweaks to make things a bit nicer.
(def crates-viewer
  {:transform-fn clerk/mark-presented
   :render-fn
   '(fn [steps]
      (into
       [:div.grid.bg-white.overflow-y.h-full
        {:style
         {:grid-template-columns (str "repeat(" (count (first steps)) ", minmax(0, 1fr))")}}]
       (for [tower (first steps)]
         (into
          [:div.flex.flex-col.justify-end]
          (for [crate tower]
            [:div.border-2.p-2.text-black.text-center.shadow-lg.bg-gray-200.border-gray-400 crate])))))})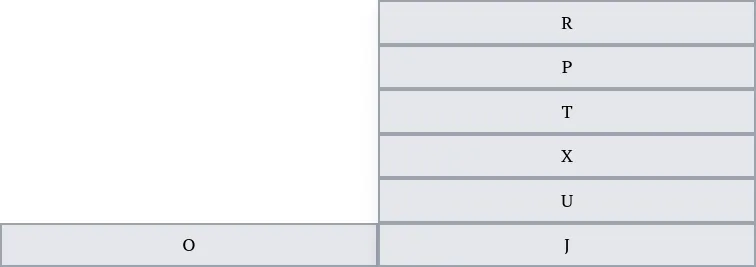
That’s better! Now we can look at adding in the rest of the steps, since we have this looking nice.
Along with Tailwind, Reagent support is also included in the SCI config so we can easily call out to that (that’s actually how we’ve been rendering these so far!).
Let’s set up a ratom with the current step and a simple slider to change steps.
(def crates-viewer
  {:transform-fn clerk/mark-presented
   :render-fn
   '(fn [steps]
      (reagent.core/with-let
        [step (reagent.core/atom (first steps))]
        [:div.flex.flex-col.justify-between.overflow-none
         [:h1 (str "Step " (inc (.indexOf steps @step)) "/" (count steps))]
         [:p "Move the slider to adjust the step."]
         [:input {:type :range
                  :value (.indexOf steps @step)
                  :max (dec (count steps))
                  :on-input #(reset! step (nth steps (.. % -target -valueAsNumber)))}]
         [:div.bg-white.overflow-y-auto.mt-4
          {:class "max-h-[20rem] h-[20rem]"}
          (into
           [:div.grid.h-full
            {:style
             {:grid-template-columns (str "repeat(" (count @step) ", minmax(0, 1fr))")}}]
           (for [tower @step]
             (into
              [:div.flex.flex-col.justify-end]
              (for [crate tower]
                [:div.border-2.p-2.text-black.text-center.shadow-lg.bg-gray-200.border-gray-400 crate]))))]]))})
And that’s it!
The completed version has a couple of extra bits, such as setting the scroll state to prevent bigger towers ruining the experience, and I encourage you to explore your own feature additions. Maybe add some animations of the crates actually moving between states, or if you want to turn it into a debugger, show multiple steps at once with extra info.
I must admit that having some of these viewers available for debugging does add a whole new dimension to problem solving.
Happy hacking!