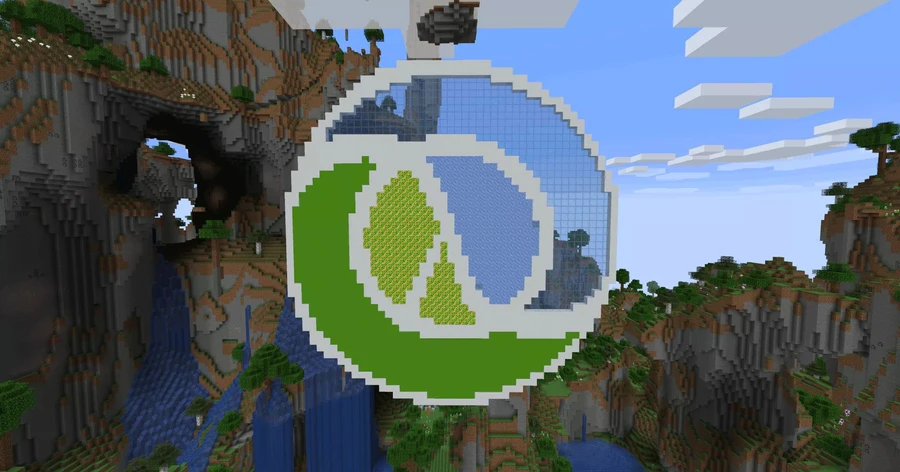
In June, JUXT attended ClojureD, the fantastic annual Clojure conference in Berlin. In the middle of the day, a number of workshops were run to teach you about a specific idea or tool, and get you working with it. A group of us decided to attend the ‘Change the (Minecraft) World with Code’ workshop run by Arne Brasseur, Ariel Alexi, and Felipe Barros. This post shows how we used what we learnt in the workshop to generate images in the game and optimized the code using Tufte.
The ‘Change the (Minecraft) World with Code’ workshop at ClojureD 2022 (Gallery https://clojured.de/media/gallery/gallery-2022/nggallery/page/5)
Arne showed us how to interact with the Minecraft world through the Clojure REPL! He started by showing off how we could use code to move the player around in the world and add items to their inventory. Using the expressive power of Clojure he was able to quickly start generating structures in the world with only a small set of smartly composed instructions. For his final trick, he showed us how to make chickens explode!
The Witchcraft project provides a convenient API for interacting with Bukkit-based Minecraft servers and is what was used in the workshop.
Having a go ourselves
After showing off his REPL-driven Minecraft-ing skills, Arne left it up to us to have a go and see what we could design. Once we had everything setup and installed we were able to start up the server, connect to it with the client, and jack-in to the REPL with CIDER. The workshop repo provides four namespaces which demonstrate a variety of ways to utilise Witchcraft to orchestrate the server and Minecraft world.
One of the more interesting functions provided by Witchcraft is
nearest-material which finds the Minecraft material which most closely
matches a given RGB color. Witchcraft provides a file of mappings
between materials and the two most prominent colors in their textures.
To determine the most appropriate material to represent a given RGB
value the nearest-material function calculates the color distance to
every prominent color, and selects the material for which this value is
lowest, and is therefore closest to in color space.
Will Caine had the brilliant idea of reading the pixels of an image and mapping them into the Minecraft world, using this function to determine the most appropriate materials to use. With a little investigation we managed to get ImageIO to read our file and before long we had RGB values for each pixel in the file!
Generating images in the Minecraft world
The Minecraft world is only 319 blocks high, from bedrock to the top of the map, so we had to scale the image so that it would fit.
Our first implementation mapped each pixel from the image to an RGB
vector lazily using for. From there we could specify a scale and
sample RGB values from the large array of values.
(ns gen-image
  (:require [lambdaisland.witchcraft :as wc]
            [lambdaisland.witchcraft.palette :as palette])
  (:import (javax.imageio ImageIO)
           (java.io File)
           (java.awt Color)))

(defn img2world
  [filename coords mc-width]
  (let [buff (. ImageIO (read (File. filename)))
        img-width (.getWidth buff)
        img-height (.getHeight buff)
        rgbvec
        (for [x (range 0 img-width)]
          (for [y (range 0 img-height)]
            (let [rgbint (.getRGB buff x y)
                  color (Color. rgbint true)]
              [(.getRed color) (.getGreen color) (.getBlue color)])))
        scale-factor (/ img-width mc-width)
        mc-height (quot img-height scale-factor)]
    (for [x (range 0 mc-width)
          y (range 0 mc-height)]
      (wc/set-block
       (-> coords
           (update :x + x)
           (update :y + y)
           (assoc :material
                  (palette/nearest-material
                   (nth (nth rgbvec (* x scale-factor)) (* y scale-factor)))))))))
After hacking our solution together we finally managed to generate an image in the world. But it was upside down!

---
(nth (nth rgbvec (* x scale-factor)) (* y scale-factor)))
---
+++
(nth (nth rgbvec (* x scale-factor)) (* (- mc-height 1 y) scale-factor)
+++
The origin coordinate of an image read into an ImageIO buffer is located in the top left corner of the image, not the bottom left as we had expected. This meant that as we iterated through the y-axis of the image we were descending towards the bottom. By inversing the y coordinates we were able to correctly flip the image.

Optimising for speed
Although our solution worked it was painfully slow to generate the
resulting image. Our first thought was that all those repeated calls to
wc/set-block might be slowing us down, so we refactored the code to
make use of wc/set-blocks to set all the blocks at once. Using
wc/set-blocks also has the added benefit that it is much easier to
undo generated images using wc/undo! as it will remove the whole image
rather than just one generated block at a time.
(defn img2world
  [filename coords mc-width]
  (let [buff (. ImageIO (read (File. filename)))
        img-width (.getWidth buff)
        img-height (.getHeight buff)
        scale-factor (/ img-width mc-width)
        mc-height (quot img-height scale-factor)]
       (wc/set-blocks
        (for [x (range 0 mc-width)
              y (range 0 mc-height)]
          (let [rgbint (.getRGB buff (* x scale-factor) (* y scale-factor))
                color (Color. rgbint true)
                rgb [(.getRed color) (.getGreen color) (.getBlue color)]]
            [x (- mc-height 1 y) 0 (palette/nearest-material rgb)]))
        {:anchor coords})))
But still our solution was slow. Had we hit a hard limit? To find out
what was really going on we needed to profile the code.
Tufte is a simple profiler for
both Clojure and ClojureScript, so we added the dependency to the server
deps.edn and wrote some profiling code. To make use of Tufte you must
identify the forms you would like to profile by wrapping them with p.
Then call the function inside profile and observe the results.
(ns gen-image
  (:require ...
            [taoensso.tufte :as tufte :refer (defnp p profile)])
    ...)

(defn img2world
  [filename coords mc-width]
  (let [buff (p :new-buff (. ImageIO (read (File. filename))))
        img-width (.getWidth buff)
        img-height (.getHeight buff)
        scale-factor (/ img-width mc-width)
        mc-height (quot img-height scale-factor)]
       (p :set-blocks (wc/set-blocks
        (for [x (range 0 mc-width)
              y (range 0 mc-height)]
          (let [rgbint (p :get-rgb (.getRGB buff (* x scale-factor) (* y scale-factor)))
                color (p :new-color (Color. rgbint true))
                rgb (p :rgb-vec [(.getRed color) (.getGreen color) (.getBlue color)])]
            [x (- mc-height 1 y) 0 (p :near-mat (palette/nearest-material rgb))]))
        {:anchor coords}))))

(tufte/add-basic-println-handler!
{:format-pstats-opts {:columns [:n-calls :min :max :mean :clock :total]}})

(profile
 {}
(p :img2world (img2world "juxt-logo.png" {:x 0 :y 150 :z 0} 200))) pId nCalls Min Max Mean Clock Total
:img2world 1 34.15s 34.15s 34.15s 34.15s 100%
:set-blocks 1 34.14s 34.14s 34.14s 34.14s 100%
:near-mat 15,400 1.47ms 28.95ms 2.18ms 33.62s 98%
:get-rgb 15,400 963.00ns 6.83ms 7.39μs 113.86ms 0%
:rgb-vec 15,400 124.00ns 42.28μs 1.14μs 17.49ms 0%
:new-buff 1 7.26ms 7.26ms 7.26ms 7.26ms 0%
:new-color 15,400 19.00ns 74.82μs 361.67ns 5.57ms 0%
Accounted 1.70m 299%
Clock 34.15s 100%The results show that 98% of the time spent in the function is spent in
nearest-material. As we know that there is a small and constrained
range of possible values for the inputs and outputs of this function,
memoize can be used to effectively cache the results, mitigating the
need to perform the same calculations repeatedly. This optimization is
particularly performant in this case as the image contains only a small
range of different colors.
---
[x (- mc-height 1 y) 0 (p (palette/nearest-material rgb))]
---
+++
(def memo-nearest-material (memoize palette/nearest-material))
...
[x (- mc-height 1 y) 0 (p (memo-nearest-material rgb))]
+++ pId nCalls Min Max Mean Clock Total
:img2world 1 322.64ms 322.64ms 322.64ms 322.64ms 100%
:set-blocks 1 317.40ms 317.40ms 317.40ms 317.40ms 98%
:near-mat 15,400 395.00ns 2.55ms 10.79μs 166.12ms 51%
:get-rgb 15,400 518.00ns 27.75μs 736.34ns 11.34ms 4%
:new-buff 1 5.10ms 5.10ms 5.10ms 5.10ms 2%
:rgb-vec 15,400 72.00ns 11.60μs 119.87ns 1.85ms 1%
:new-color 15,400 20.00ns 17.50μs 43.02ns 662.46μs 0%
Accounted 825.10ms 256%
Clock 322.76ms 100%We can now generate the image in under a third of a second, down from 34
seconds, which is a 100x improvement. Of course, on subsequent calls the
image is generated even faster as the color-to-material mappings are
already cached. wc/set-blocks is now the bottleneck, so we will leave
it there.
Have a go yourself
If you want to have a go yourself you can easily work through it on your own by reading through the detailed workshop instructions available here. There are also some YouTube videos to help you get inspired.
Thank you to Arne, Ariel, and Felipe for the brilliant workshop, to the organizers of ClojureD for running such a great conference, and to JUXT for taking us to the event.
